Welcome to our website !

Scones {Recipe}


It's the Grand Final long weekend! Instead of sleeping in, I hopped out of bed at 8am to try my hand at making some scones. Surprisingly, it was easier than I thought. By 9am, the smell of freshly baked scones were already wafting throughout the house.

This recipe by the trusty RecipeTin bakes up a batch up 10 scones in record time. The original recipes uses food processor but I used the good ol' finger rubbing method. Served with a side of strawberry jam and cream (clotted, if you are a traditionalist; whipped, if you are lazy like me), perfect for any unexpected visits of simply for an impromptu afternoon tea. The only question is: cream of jam first?

Scones
Original recipe by RecipeTin Eats

Ingredients

  • 3 cups self-raising flour
  • 80g cold salted butter (cut into 1cm cubes)
  • 1 cup milk (fridge cold)
  • Extra flour (for dusting)
  • Extra milk (for brushing)


Method

  1. Preheat oven to 200C (standard) or 180C (fan / convection).

  2. Place flour in a large mixing bowl, then butter. Combine the butter and flour using your fingertips until it resembles breadcrumb.
  3. Pour milk all over the flour (don't pour in one place). Then, gently fold flour mixture in the milk until the crumbs turn into ball(s).
  4. Transfer dough onto work surface, scrape out residual bits in the mixing bowl.
  5. Knead lightly no more than 10 times just to bring the dough together into one smooth ball, then pat down into a 2 cm / 4/5" thick disc. Dust with extra flour if necessary.
  6. Dip a 5 cm / 2" round cutter into Extra Flour.
  7. Plunge cutter straight down and back out into dough - do not twist. Repeat all over disc. 

  8. Remove excess dough from around scones, then carefully transfer scones onto baking tray, taking care not to smear / press the cut sides. 
  9. Gather together dough scraps and repeat. 
  10. Brush tops lightly with milk. (Optional)
  11. Bake for 10 to 12 minutes until the top is golden and it sounds hollow when tapped.
  12. Remove from oven, then transfer onto dish towel and wrap loosely (makes top soft).
  13. Once cooled to warm (10 - 15 minutes), serve warm.
  14. Tradition is to split the scone with hands, slather with jam and dollop on cream.

Spicy Chicken Bulgogi {Recipe}


Chicken is one of the easiest and most versatile protein to cook with, which is why my weekly grocery shopping always include two pieces of Maryland chicken fillet. Grill it, fry it or add it to a bowl of piping hot congee, there are endless ways to make a great meal out of the humble chicken Maryland fillet.

On this particular day, I crave for the sweet and spicy Chicken Bulgogi (Korean Spicy Chicken). Gochujang, the Korean spice paste form the base of the marinade, while ginger adds a nice kick to the dish. While the recipe calls for the chicken to be marinated overnight, I only managed one hour of marinating because this dish was a spontaneous decision on a week night. 

While I haven't tried this recipe using other types of meat, I can imagine it would taste just as good with pork or beef, although make sure to thinly slice the meat for the best result.

Chicken Bulgogi

Ingredients
2 pieces chicken Maryland fillet (boneless)
1/2 onion (peel and sliced thinly)
2 spring onion (cut into 1-2 inches)
2 and 1/2 tsp garlic, minced
2 and 1/2 tsp ginger, minced
5 tbs Gochujang (Korean chilli paste)
2 tbs sugar (or honey)
2 tbs Korean Rice Wine (or Chinese Shaoxing wine)
2 tbs soy sauce
2 tsp sesame oil
1 tsp black pepper
1 tsp sesame seeds
1/4 tsp vegetable oil

Method
Slice chicken thinly.

Mix all the other ingredients in a bowl to make the marinade.

Mix the meat with the marinade using your hand. Mix everything thoroughly and work in the marinade for 3 to 5 minutes.

Cover and refrigerate for a minimum of 1 hour, maximum of 12 hours. 

Preheat a pan with some vegetable oil.

Cook both sides of the meat on BBQ or pan-fry on medium to high heat until chicken is cooked through and browned.

Serve on a plate and sprinkle some sesame seeds to garnish. Enjoy it with a bowl of rice.

Salted Egg Yolk Chicken (牛油黃金鸡) {Recipe}


This Chinese version of popcorn chicken is utterly sinful and the perfect comfort food to go with a bottle of chilled beer. Coated in buttery, silky salted egg yolk sauce, this is a dish to indulge in. Sure, you might gain some weight, but it's worth it.

Salted Egg Yolk Chicken
(Recipe from The Meat Men)

2 pcs of boneless chicken thighs (with or without skin depending on preference)
Oil for deep-frying
2 red chillies (chopped)
20 curry leaves (optional)
1 egg
1 cup corn starch
1 tbsp oil 20g butter

Marinade
1 tsp sugar
½ tsp salt
¼ tsp pepper
1 tbsp rice wine

Salted egg yolk sauce (makes 2 servings)
8 salted egg yolks
4 tbsp oil
1 tsp minced garlic
1 tsp minced ginger

Method
Dice the boneless chicken thighs into 3cm chunks

Add ¼ tsp pepper, 1 tsp sugar, ½ tsp salt, 1 tbsp rice wine to chicken.  Let it marinate for 15 mins.

Steam 8 salted egg yolks for 10 mins.

Mash salted egg yolks as fine as possible.

Add 4 tbsp oil to pan. Fry salted egg yolks until foamy

Add 1 tsp minced garlic and 1 tsp minced ginger. Fry until fragrant and set aside

Add 1 beaten egg to the chicken thighs and mix well.

Pour 1 cup corn starch on a tray. Evenly coat chicken thighs with corn starch.

Heat oil to high, then deep-fry chicken thighs until golden brown. Drain and set aside.

Chop 2 red chillies.

Add 1 tbsp oil to pan, then add the chopped chilli padis and 20 curry leaves.

Add 20g of butter, and half the salted egg yolk sauce. Fry until fragrant.

Add fried chicken and toss until evenly coated with sauce.

Dining Out: Minamishima


A slice of Japanese fine dining in Richmond, Minamishima has been the talk of town since it opened in late 2014. Bringing the experience of the best sushi-ya in Japan to Melbourne, Minimashimina only serves omakase and it is booked out months in advance. We would know, because we tried to book a place twice, only to be told that it was fully booked out. The fact that we had the chance to eat there was only by chance because Tiff's parents cancelled their reservation.


The exterior of Minaminshima can be described as minimalistic. In fact, the non-descript restaurant tucked away in an apartment block was discreet and revealed little of its interior. It was designed in such a way that it was impossible to peek through to see the sushi chefs at work or the diners. This design only heightened the exclusivity and mystery of Minamishima: Only the restaurant patrons are privy to the Minamishima experience.


Indeed, upon entering the establishment, I couldn't help but felt as if I've left Melbourne and arrived in... heaven? A sleek and stylish heaven. The decor of the restaurant is focused on the long sushi bar, while a dozen or so tables tucked away discreetly on the other side of the wall. I read that the menu for tables differ from sushi bar, so I was delighted when we were seated at the sushi bar. True to Japanese standards, the wait staff were observant, attentive and well-trained. The whole service moved like clockwork and the wait staff explained the menu to us in the most well-rehearsed manner.


The best part about the omakase menu was the element of surprise: We had no idea what the chef was going to serve. I believe the menu is seasonal so I won't bother elaborating every single course. I believe there was about 12 or 13 courses, by which I mean 12 or 13 pieces of nigiri. What I could say was the menu was a symphony of tastes and flavours. Starting with the lighter flavour of whiting, reaching a crescendo towards the peak: medium bluefin tuna belly, raw and seared, then tapering off with scallop and finally concluding with the tamago.


The whole dinner was not just a meal, it was a performance and sensory experience, the perfect marriage of sight, sound and taste. The servingware and set up was perfectly thought out and in harmony with the restaurant's decor. All the chefs attention to detail was second to none. Watching the chefs make nigiri was a performance in itself. Their hands moved deftly, gracefully and delicately. The serving plates were set perfectly, nothing out of line. The Japanese' dedication to perfection has never failed to impressed and inspired me, and it continued at Minamishima.


My dinner company was just the icing on the cake. We never failed to have fun wherever we go. High-end sushi-ya or McDonalds, we always leave with more inside jokes. The experience at Minamishima would not be perfect without him and I am so glad that food brings us closer than ever.


The experience did not come cheap though. Our bill came up to almost $500 for two people, which took the crown for the most expensive meal we had as a couple. Was the experience worth it? A year on after we dined there,  it was one of the finest sushi we ever had. The experience has set a golden standard for sushi in my books and forever ruined the pleasure of mid-price sushi for me. Are we in a hurry to go back? If only we have the luxury!

If this is the way the one per cent lives, I would break my bones and work to the ground just for another taste for that melt-in-your-mouth seared tuna belly.


Minamishima Menu, Reviews, Photos, Location and Info - Zomato

No Butter Lemon Drizzle Cake {Recipe}


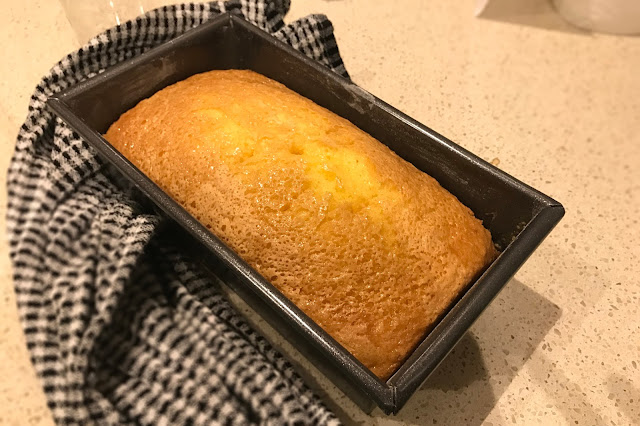
A few weeks ago I was at my manager's house and she invited us to help ourselves with the abundance of lemon the lemon tree at her backyard. I have used some in my cooking and found that it was not overly sour, so I decided to use it in baking.

I had a strange craving for lemon cake one day after work and while I was weighing all the ingredients I realised I ran out of butter! Luckily the internet came to the rescue and delivered this fluffy lemon drizzle cake. The sweet sponge contrast with the tartness of the lemon created was the perfect combination that reminded me that spring is just around the corner! So, the next time you run out of butter in your pantry, do not despair. This recipe will deliver the perfect sponge for all seasons for your dinner party.

No Butter Lemon Drizzle Cake
(Recipe from Mode of Style)

Ingredients
4 eggs
160g sugar
135g of flour
1 tsp of baking powder or 1/2 tsp of bicarb soda
Zest of one lemon

Drizzle topping
Juice from 1 1/2 lemon
85g caster sugar

Method
Beat the eggs and sugar fluffy, then add the lemon zest and flour mixed with baking powder and stir until smooth.

Bake in the oven at 175 degree Celcius for 35 to 45 minutes until golden (stick a toothpick in the cake, if the toothpick comes out clean, the center is set).

In the meantime, mix the lemon juice with caster sugar to make the drizzle.

After the cake is out of the even, prick it with holes, then pour the drizzle over the cake.

Let the cake cool down and serve with your favourite tea or coffee!

Dining Out: Elyros Restaurant and Wine Bar


A few weeks ago Steve took me to Elyros to celebrate our one-year wedding anniversary. Located in the heart of Camberwell, the restaurant and wine bar was awarded 1 Hat in The Age Good Food Guide 2017.

Upon walking in the restaurant that was converted from a 1920s old bank building, I was wowed by the elegant interior. After a phase of dining at funky restaurants, I suppose Elyros, with its brass-wrought chandeliers and clean lines were a breath of fresh air. The dining area is separated from the wine bar and on that night we were seated in dining area.

Elyros has an extensive wine list and a Cretan-inspired menu. There are a selection of meze or starters, small plates to share, mains and desserts. Elyros also offers a three course or four course sharing menu. The four course menu was what we selected for the night and it was a feast.


For starters, we were served a selection of meze that include a basket of warm bread, eggplant dip, creamy feta dip, Greek house marinated olives, cured kingfish and olive oil. When our waitress brought the tray of meze to us, we were beyond excited. We could've simply dined on the soft bread and dips alone, but there was more food to come.


Our second course was the fish special for the night: grilled salmon served on squid ink risotto. The salmon was cooked well, but I thought the creamy squid ink risotto was the winner of the dish. After the fish, we were served the slow cooked lamb and patates cooked in lamb fat and rosemary salt. I believe those are Elyros' signature dishes as I read many rave reviews about the lamb and patates.


Naturally, it did not disappoint. In fact, while Steve and I were enjoying the lamb, we thought it tasted familiar. It took us a while to realise the slow-cooked lamb tasted almost exactly the same as the lamb Steve's yiayia cooks for Christmas and Easter! However, my favourite dish of the night has to be the patates cooked in lamb fat. It was cooked to golden perfection on the outside but soft and fluffy on the inside.


Our anniversary dinner ended on a sweet note with a slice of the Cretan cheesecake with carob and walnuts. It was a lovely surprise when staff took the time to decorate the plate with the words "Happy Anniversary". Considering Steve organised the dinner, the little touch gave him some brownie points.

Overall we enjoyed our dinner. It was not anything groundbreaking but the food was classic flavours done well and perfect for our anniversary dinner. I would definitely recommend Elyros for a low-key and relaxed night out. But if you are one for food trends and fashionable dining spots, you will be better served elsewhere.

Elyros Menu, Reviews, Photos, Location and Info - Zomato

Sticky Soy Pork Belly Okonomiyaki {Recipe}


Okonomiyaki, literally means "grilled as you like" is a savoury version of Japanese pancake, made with flour, eggs, shredded cabbage, meat/protein and topped off with a variety of condiments, typically kewpie mayo, bonito flakes and spring onion. Prior to visiting Japan, I had no idea what an okonomiyaki was. In fact it was purely a (happy) coincidence that I got to savour this Japanese dish:

My first time eating okonomiyaki was back in 2015. Weary after a long day of walking and exploring Kyoto in the rain, Steve was craving for hot food and cold beer. A quick search on Google led us to a teppanyaki restaurant in a multi-level mall near Kyoto station. We were famished and ordered the first few things we saw on the menu. From the kitchen came this glorious pancake-like thing topped with writhing bonito flakes, which sizzled and smoked on the grill pan in front of us. We were famished and quite literally ate off the grill pan. The first crispy bite on the okonomiyaki when the soft, still-hot filling hit my tongue, my whole body warmed up and the colour of everything around me suddenly seemed more vivid. It might've been my hunger that exaggerated the experience, but that rainy Autumn night in that greasy, smoky restaurant watching Steve enjoying his tall schooner of Sapporo beer, I never felt happier.

Alas, I have yet to discover an excellent okonomiyaki here in Melbourne. Some came close, but none brought me back to that cold night in Kyoto. So when I saw Gourmet Traveller's okonomiyaki recipe doing the rounds on Facebook, I promptly saved it and attempted it on a similarly cold Friday night. Granted, this recipe is topped with sticky soy pork belly, which is more Chinese and Japanese. But it seemed like an interesting pairing.


The result? I was amused at how easy it was to prepare the okonomiyaki batter. Don't worry if you don't have a teppanyaki grill, neither do I. A regular frying pan will do just fine. I wasn't up to the task of slow cooking the pork belly, per the recipe, so I swapped it for my Quick and Easy Dong Bo Rou. Same same but different? Maybe, but Steve was overjoyed when he got home to find his dinner was something out of the ordinary. So that's a win in my books.

Sticky Soy Pork Belly Okonomiyaki
(Recipe modified from Australian Gourmet Traveller)

Ingredients:
3 cups plain flour
1/2 tsp baking powder
2 eggs, lightly beaten
4 Chinese cabbage leaves, coarsely torn
3 spring onions, thinly sliced, plus extra to serve
1 small sebago potato, coarsely grated
50 ml vegetable oil

To served: Japanese (Kewpie) mayonnaise

Sticky soy pork belly (Quick and Easy Dong Bo Rou)
2 strips of pork belly, skin on, cut into 2cm pieces.
3 inches ginger, peeled and thinly sliced
3 cloves of garlic, peeled
100 grams rock sugar or brown sugar
4 tablespoons light soy sauce
2 tablespoons dark soy sauce
1 cup Shaoxing wine
2 cups chicken/vegetable stock

Method:
For sticky soy pork belly, bring a medium sauce pan heat to medium high and add peanut oil. Sauté the ginger and garlic until fragrant, about 2-3 minutes. Add the sugar to the pan and stir constantly till sugar melts. Add the wine and soy sauces. Once boiling, reduce to low and pour in half the stock or water. Mix well. Place the pork belly pieces skin side down in the pan. Top up with the rest of the stock. The liquid must at least almost cover the pork. Add water if necessary. Increase heat to medium high and wait for the liquid to come to a boil. Once boiling, reduce heat to the lowest simmer, cover and braise for 20 minutes. After 20 minutes, flip the pork belly pieces and continue braising, covered, for another 30-40 minutes, basting the skin occasionally, until pork is tender enough to be broken with a pair of chopsticks. Skim off any extra oil from the sauce in the pan. Whisk the reduced sauce while the pan is still hot. If you prefer more gravy, add boiling water bit by bit to get your preferred gravy consistency. Remove and let stand. Sauce will thicken as it cools.

To make the okonomiyaki, c
ombine flour, baking powder and 2 tsp sea salt in a large bowl, make a well in the centre, add eggs and gradually add 500ml cold water, stirring until smooth and combined. Stir in cabbage, onion and potato and set aside to rest for 30 minutes.

Heat one-quarter of the vegetable oil in a 15cm-diameter non-stick frying pan over medium heat, add one-quarter of the pancake batter, spreading evenly in pan, and cook until golden on the base and beginning to set on the surface (6-8 minutes). Turn and cook until cooked through (6-8 minutes), then transfer to an oven tray and keep warm while you repeat with remaining oil and pancake batter.

Top hot okonomiyaki with Japanese mayonnaise, sticky soy pork belly and spring onion, then drizzle with glaze. Serve hot.

Itadakimasu!