Welcome to our website !

Ah Ma's Steamed Sponge Cake (鸡蛋糕) {Recipe}


I've been living in Melbourne for eight-and-a-half years now, and every winter is just as painful as the last. Perhaps its the longing for some warmth and comfort that made me crave for childhood flavours from Malaysia.

Years ago, my Ah Ma (grandma) lived with us in KL following her knee reconstruction surgery, and she introduced us to many simple but delicious traditional food. Among them is the old-fashion steamed sponge cake. Using only flour, sugar and eggs, grandma would hand-mixed in a plastic bucket. In order to create the light and fluffy texture typical of a sponge cake, ah ma would whip out her old-school spring whisk/egg beater that is the size of a hand-held vacuum, add some Fanta or Sprite to create fizz and air, then she would start whisking away until the batter was thick, glossy and creamy. The mixture was then placed in a bamboo basket and steamed until the mixture set and we would have steamed cake for breakfast or as prayer offering. Making the cake was a family affair, as we would take turns to whisk the batter.

Sadly, Ah Ma got too frail in her later years and passed away a few years ago. But the taste of the sponge cake stayed with me and on this particular winter, I have a very strong craving for it. Lucky for me, this cake is not unique to my Ah Ma - I found a few recipes from people who recreated their Ah Ma's steamed sponge cake. Although this cake is not a 100% replica of my Ah Ma's recipe, I dare say it's quite close to the original. Moreover, the new and improved recipe does not require a bucket from Bunnings, a DIY hand whisk or Fanta. My regular Sunbeam mixer and Kmart steamer did most of the work and I got to enjoy a traditional steamed sponge cake.

I am also pleased to report (especially to my dad) the cake remained soft and moist up until the very last slice. So dad, give it a go!


Ah Ma's Steamed Sponge Cake

Ingredients
140g all purpose flour
5 medium eggs
240g sugar

Method
Beat egg and sugar in a mixer over low speed for 2 minutes, increase to medium high speed and continue to beat until double in volume (about 30 minutes), thick, creamy and pass the ribbon stage. Change to low speed, beat for another 1 to 2 minutes to minimise the air bubbles.

Sift in flour, mix slowly with a spatula and combine well.

Pour the cake mixture into a prepared 8 inch lined baking tin, rest for 10 minutes.

Steam over high heat for 40 minutes, then wait 1 minute before removing the cake.

Serve after slightly cool down.

Golden Roasted Melting Potatoes {Recipe}

I'm not sure about you, but this winter weather gives me all sorts of cravings for carbs and fatty food. Just the thought of warm, roasted creamy potatoes makes my heart flutter and stomach grumbling.


I served this golden roasted melting potatoes a few weeks ago with roasted chicken wings and it was simply divine. After punch through the golden, buttery and crispy outside, the soft, warm and creamy insides will almost melt in your mouth.

I can't say this is the easiest recipe, but when done right it is a crowd pleaser that goes with just about anything.


Golden Roasted Melting Potatoes

Ingredients
4 potatoes, washed and peeled
4 tablespoons butter, melted
1 teaspoon dried herbs
3/4 teaspoon salt
1/4 teaspoon black pepper
3/4 cup low-sodium chicken broth
2 garlic cloves, minced

Method
Preheat oven to 230C, making sure one of the oven racks is in the upper-middle position. Cut off the rounded edges of the potatoes, then cut the potatoes into 1-inch thick slices.

In a large bowl, toss the potatoes with butter, dried herbs, salt and pepper. Place the potatoes in a single layer in a ceramic or metal baking dish.

Roast the potatoes for 20 to 22 minutes, until the bottoms are browning around the edges.

Remove the baking pan from the oven and flip the potatoes with a flat spatula. Return to the oven and roast for another 15 minutes.

Remove the pan from the oven, flip the potatoes again and add the chicken broth and garlic. Roast once more until the potatoes are tender and the sauce has reduced just slightly, about 15 minutes.

Serve the potatoes with the sauce drizzled over the top.

Nigella Lawson's Soy Mirin Glazed Salmon {Link to Recipe}


I've been stuck in a writing and cooking rut for the longest time possible and believe me, it was incredibly frustrating. Between getting married and settling into a new job last year, life has been a whirlwind since Steve and I got engaged way back in 2015. Seriously, it feels like I've skipped 2016 and landed straight into 2017. Now that I have settled into a nice routine of full-time work and domestic bliss with my shining new husband, I'm inspired to share my food adventures again!

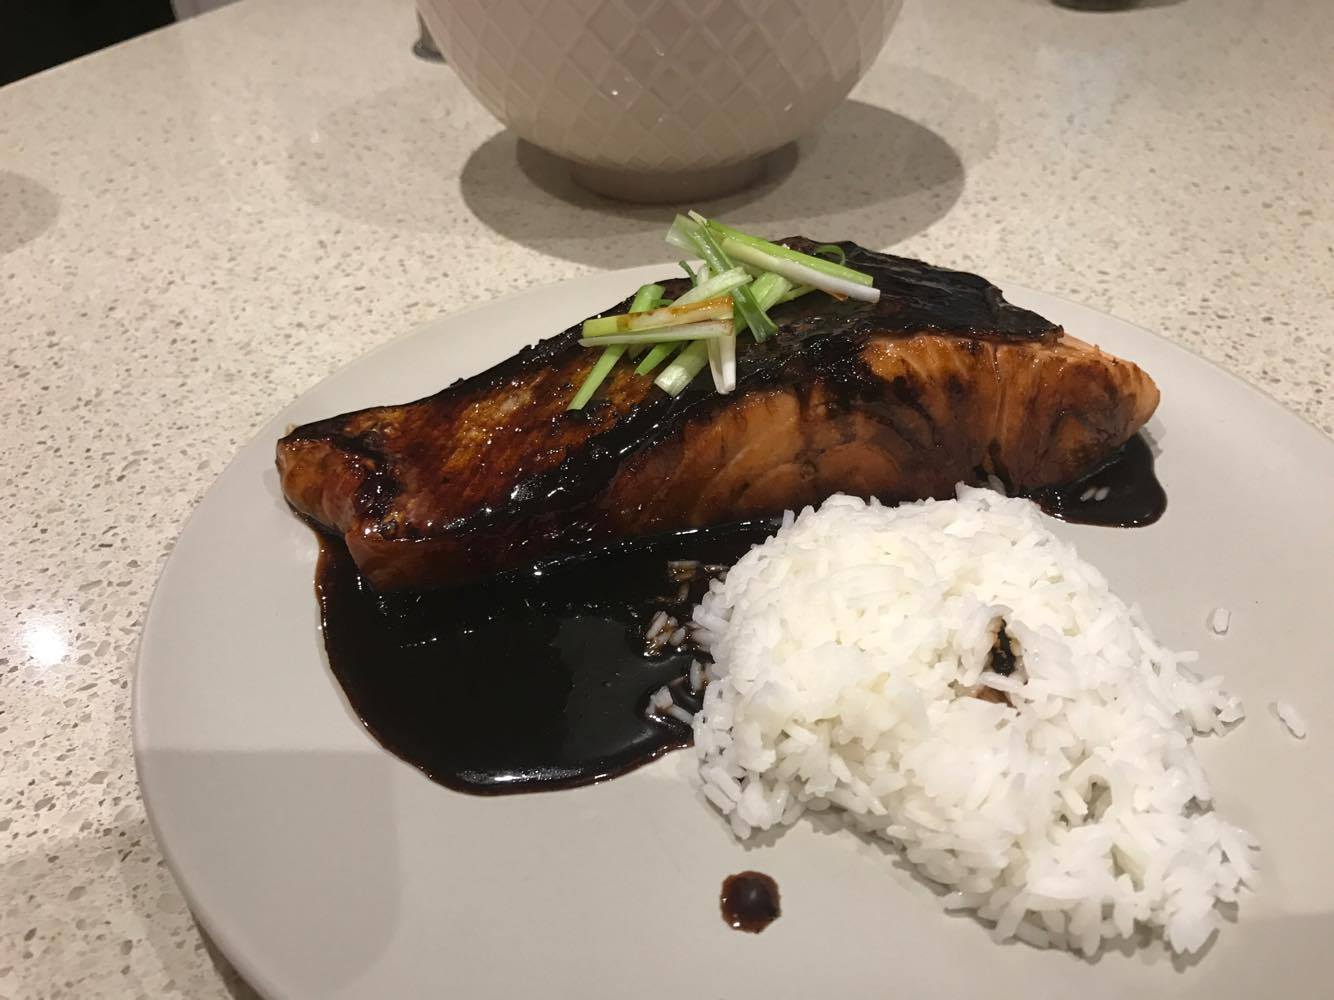
Today's recipe is not mine, rather it belongs to the famous Ms Nigella Lawson. I chanced upon it when I googled quick and easy ways to cook salmon. What I love most about this recipe is that it's simple, quick and easy, but it doesn't look sloppy. You may have most of the ingredients in your pantry, bar the mirin and rice wine vinegar. But you can easily find these in your local supermarket's international food aisle.

The salmon is cooked in a hot pan so place it skin-side down first and cook for four minutes to get crispy skin. Use a spatula and apply pressure on the salmon to prevent the skin from shrinking. Avoid the temptation to turn over the salmon before the time is up to ensure the salmon skin has enough time and heat to crisp up.

Once the salmon is cooked, use the leftover marinade and whatever salmon goodness that is left in the pan to make a thick, dark and glossy glaze. Then garnish with some spring onion and serve it over a bed of rice for a yummy dinner.

Although this recipe is not for the health-conscious (15g of brown sugar!), it is an indulgence on a whim and simply perfect for a cold night.

Get the recipe here!

Dining Out: Chur Burgers Hoyts Chadstone

For way too long, going to the movies meant being cramped in a university lecture hall-sized room that smells like a mixture of body odour and stale popcorns, fighting over arm rest in seats that are still dank from other people's butt sweat. You either get too cold or too warm halfway through the movie and god forbid if you watch a movie during lunch or dinner time: You only had the choice of overcooked (and overpriced) hot dogs or bucket-sized popcorn.

But it seems that the cinema management has finally upped their game to give movie-goers a much better experience, because while I was swimming in my newly-wed bliss (and missed all of 2016's movie blockbusters), Hoyts Chadstone underwent a complete refurbishment. When a good friend of mine took me on a movie date earlier this year, I was wide-eyed in astonishment at the complete transformation of Hoyts.


Soulless snack, food and drinks check out counters have been replaced with a groovy Treats City that has a vast variety brand name snacks and different flavours of popcorn in resealable bags so you can take home the leftover.


If you are feeling hungry, fear not for having to ruin your movie experience with a questionable-looking hot dog on soggy bread! Chur Burger has partnered up Hoyts Chadstone to bring the gourmet burger experience to movie-goers. The much loved Sydney burger chain has received wide recognition for being one of the best burgers in Australia and I was elated to be invited to try it out.

Chur Burger Chadstone is run by Head Chef Warren Turnbull, who believes in offering a great burger at a great price. Using fresh and tasty ingredients, each burger is cooked to order and it really showed through the burgers we got.


The Chur Beast is for those with a serious appetite: Double grilled beef, double bacon, double cheese, tomato jam, BBQ sauce, mustard mayo, it was a burger that truly lived up to its name. However, it was definitely not a sloppy burger. Steve reported back to me and said the beef patties were cooked right to medium rare and it was evident that the ingredients and condiments were fresh.


(FYI, I gave Steve one job: "take a nice, Insta-worthy picture of your burger" and he presented a front-on tight shot of his burger, though I must say the burger is making my stomach grumble at 11:00pm on a Wednesday night...)

I opted for a more modest fish burger to the protest of Steve: "The people who invited us will think what a waste of money inviting this girl who got possibly the least popular burger item on a burger menu ever!" Well, for the fish burger haters, let me say this: It was the best damn fish burger I ever had.


The crumbed fish fillet was cook to crispy perfection and I could taste the fish, rather than the usual sloppy, starchy mess I was used to. We also got sweet potato fries and chips with chilli salt for sides. The serving was generous and the price was fair for a burger eatery right in Hoyts Chadstone.


We thoroughly enjoyed our night out. Watching the latest flick in the new Xtreme Screen auditorium was simply a sensory delight and the wider reclining seats made the experience much more comfortable. Since the reopening of Hoyts Chadstone, I've watched more movies in six months than I had in three years. But now my pre-movie dining options will include Chur Burger too.


SaveSave Disclaimer: I was a guest of Hoyts Chadstone and Chur Burger in return for my honest review. All thoughts and opnions herein are my own and not influenced by the developing company, and/or its affliates, in any way.


Chur Burger Menu, Reviews, Photos, Location and Info - Zomato

Dining Out: Bahari, Richmond

A while ago, I was fortunate to be included in a very special dinner that showcased the many versatile ways of cooking with halloumi cheese.

Although it was a cold and wet Wednesday night, the crowd turned out in full force and we dined in a cozy setting at Bahari The Hellenic Palate, Richmond. Situated on Richmond's busy Swan Street, Bahari is Masterchef contestant Phillip Vakos' space to showcase his interpretation of Greek food. Bahari has been open for over a year now and it is a sought after foodie destination in Melbourne.


So, it seems fitting that the cosy space is the venue for showcasing Cypriot halloumi. Greek food is traditionally enjoyed together with friends and family, and the long banquet table setting certainly reflected that. Chef and owner, Phillip Vakos, tailored a banquet menu specifically for the night to showcase the versatility of halloumi cheese, and my oh my, the food was simply beautiful!

We started off the night with trio of dips, and the bread won murmurs of approval around the table: It was the fluffiest, softest pita bread I've ever had! The waiting staff must've refilled the bread three or four times - it was that good!


I loved Bahari's take on the traditional saganaki too. Although my Greek-Australian husband mentioned that he preferred the stronger taste of the traditional saganaki, I was delighted with this "Gringlish" version that features pomegrenate molasses which adds a fruity twist to the traditional fare.


The rest of the small plates were pleasant surprises. Who knew that you can make fritters with feta? The halloumi and thyme cigars with honey drizzled over the top struck a perfect balance of salty and sweet.


After the small plates were served, chef Phillip demonstrated how to make sheftalia, which happened to be one of my favourite Greek dishes. Put simply, it's the Greek version of meatball, but in a tubular shape. It tastes pretty similar to the Hokkien style Ngor Hiang that I grew up with. Sheftalia is wrapped with the membrane that surrounds the stomach of pig or lamb and although the preparation may be intimidating, the end product is definitely worth the effort.


Of course, the sheftalia we sampled that night was the best I've had, filled with pork, fennel and halloumi. It was a shame that I was feeling pretty full at that point so I only had several bites, but Steve loved every bit of it and gladly ate my share.


No Greek dining experience would be complete without lamb. So, as part of our main course, we were served slow roasted lamb shoulder. Needless to say, it was juicy, tender and falling-off-the-bone delicious!


For desserts, we sampled on some halloumi pistachio baklava, galaktoboureko and halva ice cream. Galaktoboureko, a soft pillowy custard topped with pastry, then drizzled with sugar syrup always tend to be sickly sweet, but I think Bahari was mindful not to be too heavy-handed on the syrup. As a result, the delicate custard shone through, making the dessert experience very pleasant.


We left Bahari a well-fed and happy crowd. It has been quite a while since the event and you know what, I might just make it my mission to go back again for another feed.

Bahari The Hellenic Palate Menu, Reviews, Photos, Location and Info - Zomato

Coconut Loaf Cake {Recipe}

A homage to the humble banana bread, this coconut loaf cake is the result of a bored Sunday afternoon. Oh how I miss the luxury of being bored - two weddings, four trips overseas, a new writing job and a new day job later, I am so happy to be reconnecting with my hobbies.


This cake taste best when toasted - something a good friend of mine discovered. Indeed, the rich aroma of coconut lingers in the kitchen long after I've eaten the cake. The cake itself is soft and moist, while the desiccated coconut simply adds to the flavour - a tropical twist to the classic loaf cake. Perfect for a summer's day, I particularly enjoy the cake with a cup of tea on a quiet afternoon.


Coconut Loaf Cake 
Recipe adapted from Oh So Busy Mum

Ingredients

175g butter, softened
290g caster sugar
175ml coconut milk
3 eggs
1 tsp vanilla essence
5 tbsp desiccated/ shredded coconut
1 + 3/4 cups plain flour, sifted
1 tsp baking powder
1/2 tsp salt

Method

Preheat oven to 160C. Grease and line a loaf tin with baking paper.

Cream butter and sugar together with an electric mixer until the butter mix is light and creamy.

Slowly add eggs one at a time, mix on low speed for a few seconds until just combined.

Add coconut milk and vanilla. Mix lightly until combined.

Add flour, baking powder and salt. Mix slowly until combined.

Using a spatula, fold in the desiccated coconut. Try not to overtax.

Pour mix into a loaf tin. Bake for around 1 hour and 20 minutes or until a skewer comes out clean.


Travel Diary: Kiyomizu-dera Temple, Kyoto and Kimono Rental {Japan}

This is a way overdue post about my trip to Japan back in November last year. Truth is, ever since Steve and I got engaged, things have been chaotic and busy to say the least, what with organising the wedding etc. Before we realise anything it's already July and I am deeply reminiscing the good times we had in Japan. So I'm going to relive our Japan trip in between wedding and food posts. Instead of posting our trip chronologically, I'm just going to post it randomly.

While I was planning the trip, I was most excited to visit Kyoto. After reading Memoirs of a Geisha when I was 16 or 17, I fell in love with the author's description of Kyoto. When I watched the movie adaptation of the book, I was entranced by the quaint city. I wanted to visit every shrine, temple, palaces, pavilions and absorb all the heritage and culture!

Our first stop in Kyoto was Kiyomizu-dera Temple, a Buddhist temple that was listed as one of UNESCO's World Heritage Site. But before we make our way to probably one of the most famous iconic sights of Kyoto, we had to get a make over.

Kimonos!

Yes, we walked around Kiyomizu-dera temple site in our rental kimonos. It was a rather harrowing experience for Steve at the kimono rental shop because him (and four or five other strangers) were told to strip down to their undies and dressed by an elderly lady. It was a similar experience for me, though I got to pick my own hairstyle etc. Steve was quite defensive initially about wearing a kimono, but later on agreed that it was a smart move to wear the loose robes in 25C heat.

A few minutes' walk uphill surrounded by quaint little shops selling teaware, snacks and various other knick knacks, we were greeted by vermillion coloured gates and shrines. Although I have seen similar shrines in Tokyo, the bright colours still tickled my fancy.


The view was simply spectacular. I was fascinated at the contrast of the vermillion gate against the drab monotonous commercial and residential buildings in the distance. 

After a few minutes of walking, we were in front of a large brown structure that looks like a theatre stage. We finally reached the main hall. The temple's main hall is still a place of worship and many worshippers were there praying for good luck or for their wishes to be granted.


There were many look out points and walkways that offer spectacular view of the temple surrounding. We were there in early Autumn when the leaves started turning into beautiful hues of red and orange. It was magical and the leaves glimmered under the golden late afternoon sunshine.

Don't forget to look back as you make your way around the temple surroundings, because we did and simply blown away at the magnificence of the main hall's structure. Can you believe not a single nail was used to construct it? Wow!


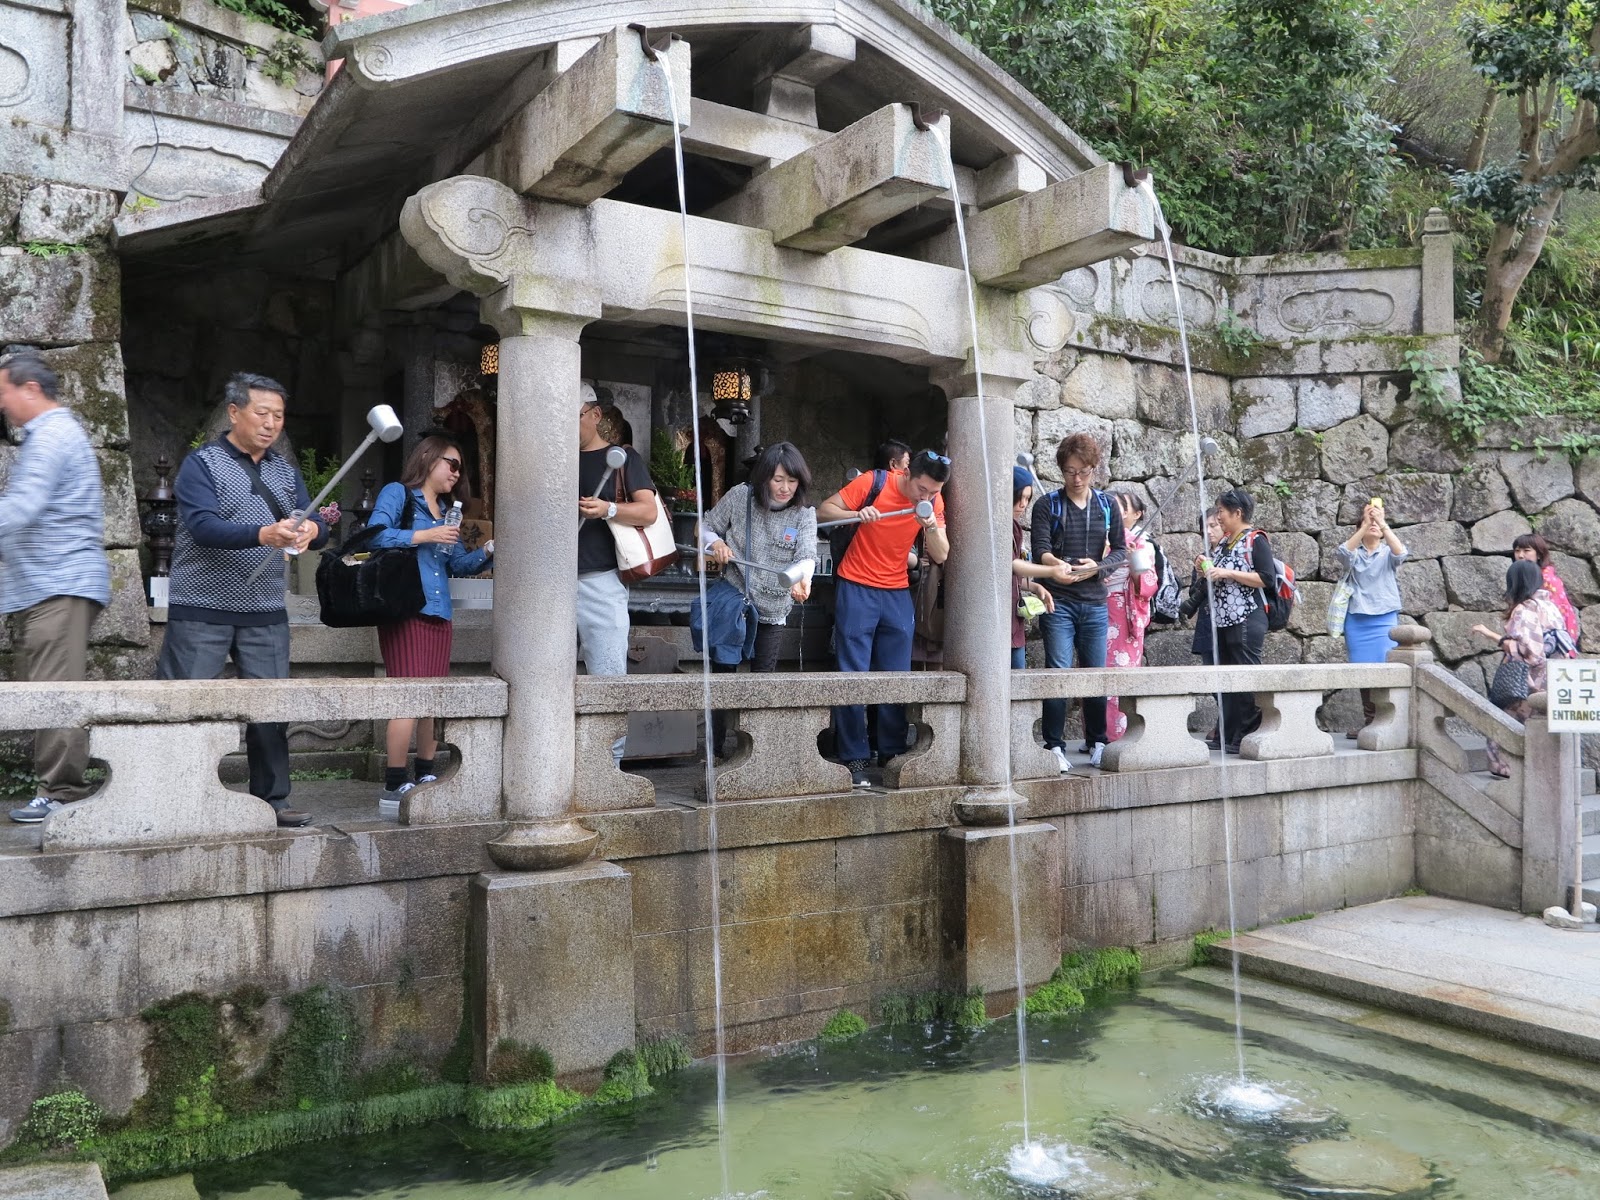
Beneath the main hall, you'll see the Otawa waterfall with three streams of water that falls into a pond. Each stream represents longevity, luck in love and success in school. Visitors can drink from each stream as it is said that you'll be blessed with benefits from each stream. I drank from one of the streams and as you can see, it was packed with other tourists looking to get some good luck and fortune.


Despite the throng of tourists that swarmed the temple when we visited, we still had a great time. Kiyomizu-dera temple is synonymous to Kyoto and I'd say if you only have one day in Kyoto, do make it part of your itinerary. It's only a 15-minute bus ride away from Kyoto JR Station, or about 30 minute walk from Kyoto JR Station. 

Get There and Around
Kiyomizu-dera can be reached from Kyoto Station by bus number 100 or 206 (15 minutes, 230 yen). Get off at Gojo-zaka or Kiyomizu-michi bus stop, from where it is a ten minute uphill walk to the temple. Alternatively, Kiyomizudera is about a 20 minute walk from Kiyomizu-Gojo Station along the Keihan Railway Line.

SaveSave